|
A great improvement in CNC file cutting creation for Wing
panels ribs and templates
Since version 2.28 of Profili Pro a new wizard to create a Cam
project for wing panels components (ribs and templates) has been added to
Profili Pro. In this way to manage the creation of CNC cutting files (GCode) is
simpler and more customizable.
Older versions used a different way to manage cutting file creation. In the
latest panel of the Wing panel wizard you were prompted to specify a sheet
format where ribs and templates should be placed. Then you were
able to rearrange them with the Preview function.
Since version 2.28 a new wizard to generate cutting files as a Cam project has
been added.
The old functions are still included for backward compatibility, but they are
labeled as 'obsolete' in the application.
Now the workflow is: the wizard creates one or more Cam
projects, and they will be automatically opened by the new
application devProf.
Here is a brief list of the advantages of the new wizard based
approach:
-
You can select a range of elements to print or export (ribs and nose checking
templates)
-
Automatic creation of a Cam file compatible with devCad Cam Pro and devProf
-
You can have in depth customization of the Cam file, you can now move, rotate,
scale, mirror, make copy-paste of elements from a Cad document to another,
modify the cutting order, the milling and engraving tool, move/delete/arrange
bridges and so on...
-
You can adjust size, font, placement of every text label associated with the
parts, and you can optionally select to engrave the text with a different
engraving tool
-
You can modify the sheet format of the Cam project, without modifying the wing
panel itself.
-
Every created Cam project is a true .dc2 file (the Cam file format managed by
devCad Cam Pro), so you can open them again using devProf or devCad Cam Pro to
modify the Cam project or create/simualte the job them..
-
Automatical displacement and arrangement of the parts in the sheet (nesting).
You can also customize the nesting parameters, and then if you like you can
rearrange manually the parts using devProf.
-
You can specify how many copies you want of the parts (for example double copy
for left and right ribs)
-
DevProf, a new Cad tool supplied together Profili, can now manage in a simple
way the Cam projects created by Profili Pro itself. DevProf is compatible with
devCad Cam Pro and offers some functions of devCad Cam Pro itself, but in this
way you don't need a devCad Cam Pro license to manage a Cam project. All the
functions to modify the job, create the cutting files and preview the job by a
3D simulator are included in devProf
-
A preview of the milling job is included by a 3D simulation process
To start the new Wizard:
-
click the '
main menu, the
Wing panels management
dialog window will start
-
select the wing panel you are going to cut
-
click the '
Now the Wizard will start. It includes 4 panels:
-
Items selection: you can select here
the parts you are going to cut
-
Material size and properties: You
must specify here the material size, the origin of the job coordinates and
other properties referred to the Cam project
-
Cutting properties: You must specify
here some settings of the CNC job
-
Preview and nesting settings:here you can
check the preview of the cam project(s) and modify the nesting setting
Once you finished the Wizard, the devProf application will
start. DevProf take advantage of the devCad team technologies to manage, modify
and manage Cam projects.
In this way the Cam projects just created are compatbile not only with devProf,
but also with devCad Cam Pro, since release 1.09.
Please take a look at the Help of devProf to have more info about the functions
supplied by this new application.
Here is an in depth view of the workflow involved by the new Wizard:
Click the '
main menu item, the Wing panels management dialog will start (see the picture).
Select the Wing panel you are going to print or export, then click the menu as
in the picture below:
The Cutting wizard will start. The goal of the Wizard is to specify and create
Cam project(s), with all the requested parts (ribs and templates) included and
ready to cut.
Here is a brief description of the 4 Wizard panels:
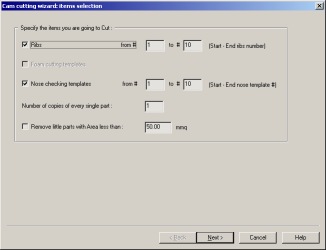
Items selection:
You can select here the parts you are going to cut
Depending on the type of wing panel, only some of the options will be
available.
You can specify how many copies you want of the parts (for example double copy
for left and right ribs).
|
|
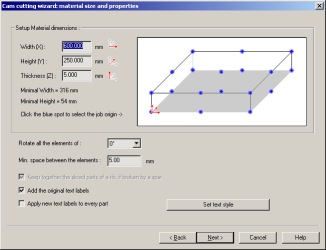
Material size and properties
Here you must specify the material size and setting for the Cam project(s).
You can also specify some spacing parameters for the parts, force to rotate
them, and the text labels to add. You can then select to engrave these text
labels, in next wizard panel.
|
|
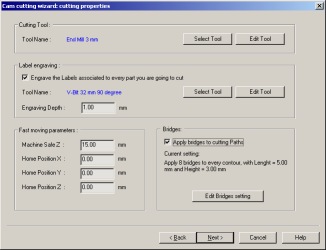
Cutting properties
Here you will specify the cutting/engraving jobs.
Cutting tool selection
Engraving tool selection (optional, to engrave text labels)
Rapid movement parameters
Bridge generation and settings. The bridges are little part of material left
uncutted, to avoid the parts go away during the milling job.
|
|
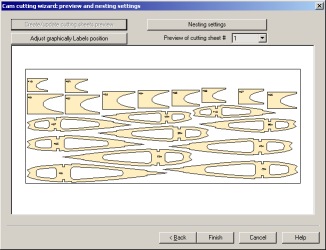
Preview and nesting settings
Here you can check the preview of the cad document(s) and modify the label
placement and nesting setting.
Press 'Create/update cutting sheets preview'
to create the preview picture, or to update it if you modified something. Using
the scroll list you can select the Cam project to preview, if multiples.
Pressing 'Nesting settings'
you have access to the 'Nesting settings' dialog, where you can customize the
way you want the parts displaced in the sheet. You must then press one more
time the 'Create/update cutting sheets preview' button to preview the new
settings.
Pressing 'Adjust graphically Labels position'
you have access to the 'Adjust the Labels position or remove some of them'
dialog, where you can adjust the placement of the labels or remove some of them
|
Once you finished the Wizard, the devProf application will
start, with a Cam project loaded for each created sheet. See the picture:
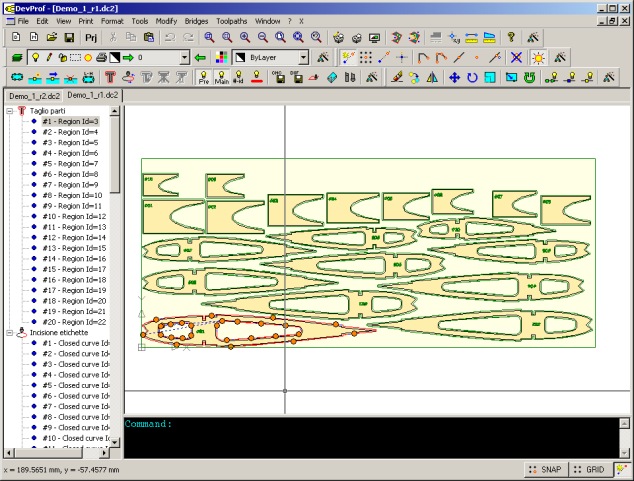
DevProf is a simplified Cad/Cam application including some functions to modify
a Cad document. You can think it as a simplified version of devCad.
The license of devProf is linked to Profili XT and Profili Pro.
If you are running a licensed version of Profili XT, the Cad functions of
devProf will be available.
If you are running a licensed version of Profili Pro, the Cam functions of
devProf will be available, as well.
In this way you don't need a license of devCad to manage the Cad documents
created by Profili.
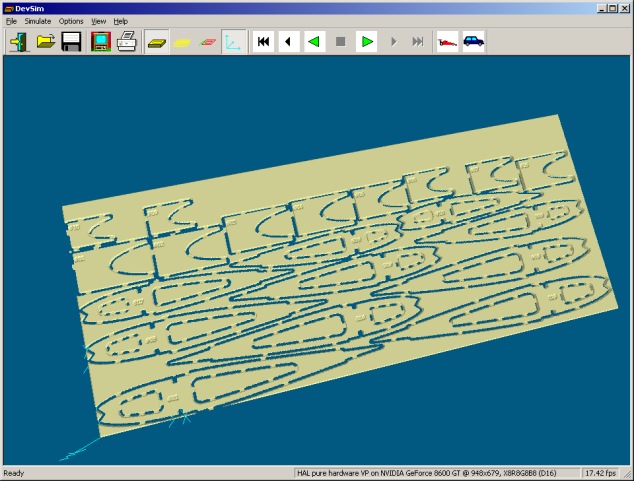
Using the 'Toolpaths - Save Toolpaths in Machining code' you can now create the
milling file, selecting the right posprocessor file. Using the 'Toolpaths -
Simulate Toolpaths' you can now start a 3D application to simulate the milling
job, see the picture:
|